Integration member
Integration member is a tool that enables integration of results from one or more 2D and 1D members and their subsequent presentation in the form of components of the internal forces and deformations of 1D members (meaning that it enables presentation of set of 7 components of 1D Internal forces: N, V_y, V_z, M_x, M_y, M_z, V_r and set of 6 components of 1D deformation: u_x, u_y, U_z, φ_x, φ_y, φ_z plus U_total).
Following images demonstrates examples of practical use of Integration member:
The procedure to input an Integration member
1. Calling the Integration member function:
Go to Results > Tools (2D results) > Integration member.
(Remark: Only works for ppe v17)
2. Adjustment of required parameters:
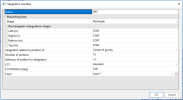
Adjust properties (see picture below) and confirm by [OK].
3. Definition of longitudinal geometry:
Definition of longitudinal geometry may be initiated in two modes (Line or Polyline) with following options: Straight line, Circular arc, Parabolic arc, Bezier curve, Spline curve, Definition by existing line.
Procedure: Based on selected mode define two or more points and confirm by Esc or via context menu
Input or modification of Integration member does not delete or influence results of global FEM analysis.
Properties of the integration member
Name
This property identifies the integration strip.
Tip: to select any Integration member in the project write into command line sel + spacebar + Name of Integration member (example: “sel IM1”).
Boundary object
Defines space in the project from witch Results will be integrated
Shape
Defines mode for Boundary object definition. There are 4 options:
Circle – defined by Radius (in meters)
Square – defined by Side (in meters)
Rectangle – defined by 4 offsets (in meters)
Ellipse - defined by 4 offsets (in meters)
Integration relative to position of
This parameter has 2 options:
Center of gravity – This is the default option. With this option theoretical centre of gravity is detected in each section. Integration is then referred to the center of gravity.
Definition axes - With this option integration is referred to definition axes. In cases where position of definition access differs from position of theoretical center of gravity, values of bending moments My and Mz are influenced by normal force acting on eccentricity.
Number of sections
This parameter defines on how many sections evenly spaced along the length of Integration member results will be integrated and presented.
Selection of members for integration
All – With this option internal forces are integrated from all members that are fully or at least partly inside the bounding box.
User defined - This option allows manually define set of members that will be excluded from the integration. In case this option is selected, additional action buttons "Exclude members from integration"appears in the properties. That may be used for definition of et of excluded members.
Remark: in case 1D or 2D member is only partly inside of the bounding box, results are integrated only from the part of such member that is inside the bounding box
LCS
This property specifies the way the local axes of the Integration member are determined.
More about LCS in chapter Common beam parameters
LCS Rotation
This value defines the rotation of local axes of the Integration member. The rotation is measured around the Integration member longitudinal axis, i.e. X-axis.
More about LCS rotation in chapter Common beam parameters
Layer
Any entity including a 1D members can be put into a layer. The layer can thus comprise entities that have something in common (e.g. one floor, columns of one floor, columns of the same length, etc.) Once layers are defined and assigned, they can be used to e.g. display just a part of the structure, make selection of that particular part, etc.)
Displaying of Integration strips
Colour + style
It is possible to modify the colour and pen (style and width) that will be used for drawing of Integration member. Go to Setup > Colours/Lines. There are two items:
Integration member system line – controls display of system line
Integration member boundary – controls display of boundary object surface
View parameters
The Integration member has its own view parameters group. This group is only available in case at least one Integration member is defined in the project.
Tab Structure
Centerline
ON = Integration member center line is displayed
OFF = Integration member center line is not displayed
Boundary object
none = only the center line of an Integration member is displayed
Wired = only the contours of an Integration member are displayed
Transparent = Integration member is rendered with transparency
Tab Labels
Display integration strip label
ON = the name of the strip is displayed
OFF = no label is shown
Results
Results on Integration members are displayed as 1D member results. It is necessary to tick on checkbox “Integration strip/member” to see results on Integration member:
Following results support Integration member:
1D internal forces – Internal forces are integrated from all 1D and 2D members within the Boundary object. In case any object is only partly inside the Boundary object, only internal forces from that part which is inside the Boundary object are integrated.
1D deflection – For each section of Integration member average value of deflection of all members within the Boundary box is determined.
Member stress and code checks
Member stress and code checks are not available for Integration members.
Theoretical background
The integration of the results from 2D members is performed in following steps:
At first force resultants are calculated in each section using following formulas
Remark: For the sake of formulas simplicity, the case where Integration member is defined in the positive direction of the x axis is considered.
Subsequently, the force resultants are converted to the components of internal forces on 1D member. Eventually those components are presented on Integration member.


