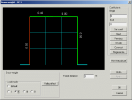
Adjusting the snow generator parameters
The main dialogue of the snow generator enables the user to control the process of load generation. The meaning of individual parameters and control buttons is given in a brief table below.
The dialogue also displays the contour of the structure or its part (i.e. the planar section) that will be considered for the load generation. 1D members that will be subject to the generated load are drawn in thick line. The active 1D member is in red while the others are in green. The remaining 1D members of the structure, i.e. those that will not be subject to the generated snow load, are drawn in thin line.
If the snow load is to be generated to a specific code, it is possible that some of the loaded 1D members are divided into several intervals. The division is controlled by the regulations of the particular standard.
In addition, the user may decide to divide any of the existing intervals or 1D members into two parts. This division may be applied recursively, so any of the 1D members can be divided into as many intervals as necessary. And vice versa, any of the two adjacent intervals may be connected to create one interval and ultimately a single 1D member.
Hatches drawn at the thick-line, i.e. loaded, 1D members indicate the direction of the generated load. Hatches attached to a 1D member from outside of the structure contour mean that the load produces pressure.
Parameters
|
Load mode |
This item selects the mode of snow load. |
|
Valley effect |
If the building is located in a valley, this button enables the user to take account of this fact. |
|
Frame distance |
The distance between two adjacent frames defined before opening the dialogue may be reviewed and/or edited here. |
|
Coefficients |
This group defines shape coefficients. A set of control buttons (see below) accompanies the input boxes. Begin = adjusts the value of shape coefficient at the beginning of the interval End = adjusts the value of shape coefficient at the end of the interval |
Control buttons
|
Set coefficients |
The value of coefficients typed in the Begin and End input boxes, is assigned to the active interval or 1D member of the structure contour (i.e. to the 1D member drawn in red thick line). |
|
Next |
The focus is shifted to the next interval or 1D member. The next interval or 1D member becomes active. |
|
Previous |
The focus is shifted to the previous interval or 1D member. The previous interval or 1D member becomes active. |
|
Divide |
The active interval or 1D member is divided in the given point. The point of division is defined in a dialogue that opens after the action is started. |
|
Connect |
This function is applicable only if some 1D members have been already divided. The function does nothing, if undivided 1D members form the contour of the structure. Two intervals are joined together. The rule is that the active interval is preserved including the coefficients and the next interval is linked to it. |
|
Regenerate |
This button resets the program default values. It sets all the coefficients to their default values and deletes all possible intervals created by the user. |
|
Print picture |
The current picture can be printed on an installed printer. |

