Importing the cross-sections from another project
Quite often, the user may encounter the situation that s/he wants to use the same cross-sections in several different projects. Especially for "man-made" cross-sections (i.e. not rolled ones), the repetitious definition of the same cross-sections may be rather time consuming and boring. What’s more, it may become a source of serious mistakes.
SCIA Engineer enables the user to solve this task effectively and clearly. The procedure consists of two separate steps and is limited only by one rule.
Export of required cross-sections from the "source" project
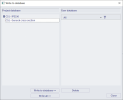
Firstly, the cross-sections defined in one project must be exported into an external database. Later, they may be imported into other projects. The export can be controlled in the Write to database dialogue.
The left hand side of the dialogue lists all the cross-sections defined in the current project.
The right hand side of the dialogue lists all the cross-sections saved in the selected user-database file.
The buttons below the list boxes can be used to manage the external database.
|
Write to database |
Writes the selected cross-section from the list of project cross-sections into the database file. |
|
Write all |
Writes all the cross-section from the list of project cross-sections into the database file. |
|
Delete |
Deletes the selected cross-section from the database file. |
The procedure for export of cross-sections into an external database
-
In it is not the case, define the required cross-sections in the original (or source) project.
-
Open the Cross-section manager.
-
Define a new or browse for the existing User-database file.
-
The Write-to-database is opened on the screen.
-
Export the required cross-sections.
-
Confirm with [OK].
-
Close the Cross-section manager.
Import of required cross-sections into the "target" project
Once the required cross-sections have been successfully exported into the user-database file, they may be imported into the target project.
The import can be controlled in the Read from database dialogue, which is similar in appearance to the Write to database dialogue (see above).
The left hand side of the dialogue lists all the cross-sections defined in the current project.
The right hand side of the dialogue lists all the cross-sections saved in the selected user-database file.
The buttons below the list boxes can be used to import items from the external database.
|
Copy to project |
Copies the selected cross-sections from the external user-database into the current project. |
|
Copy all |
Copies all the cross-sections from the external user-database into the current project. |
The procedure for import of cross-sections from an external database
-
Open the Cross-section manager.
-
Browse for the existing User-database file.
-
The Read-from-database is opened on the screen.
-
Import the required cross-sections.
-
Confirm with [OK].
-
Close the Cross-section manager.
Limitations of the import process
Despite the fact that the Import is rather versatile, there is a limitation with reference to material code of cross-section materials. As a cross-section stores, among others, the information about the material it is made of, there is a rule concerning materials defined in the project.
Note: AT LEAST ONE of the material codes defined in the source project MUST also be defined in the target project. Otherwise, the import is not made correctly.
Example:
|
Source project material codes Material codes defined in the source project, i.e. the project from which the cross-sections have been exported |
Target project material codes Material codes defined in the target project, i.e. the project into which the cross-sections are being imported |
|
|
CSN, EC, DIN |
EC, SIA |
correct |
|
CSN, DIN |
EC, SIA |
INCORRECT |
|
CSN,DIN |
DIN |
correct |

