Step 8: Execute the Check
All preparations have been made; the Check is linked to SCIA Engineer and can now be executed.
Step 8.1: Display the Brief and Graphical output
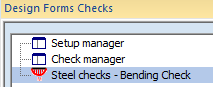
After closing the Check Manager the new check will be shown in the Design Forms Checks service:
As with all Check services in SCIA Engineer, Checks are only visible in case the project is calculated. So if the new Check is not shown, perform a linear calculation.
The tree shows the subgroup Steel checks in which the Bending check is listed. Since in this case there is only one item in the Steel checks subgroup this item is shown on the same line and its icon is shown at the front of the subgroup. Later on in this manual, when more Checks are added to this subgroup the different Checks will be shown indented.
Select the Steel checks - Bending Check in the service. The Property window will show the properties of the Check:
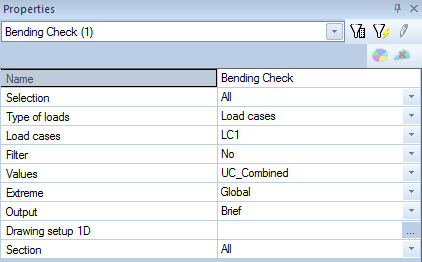
This Property window shows the standard properties as known also for other 1D member checks like Steel, Timber, Aluminium,...
The property window shows that the Check will be executed for value UC_Combined (note that in this window the subscript was replaced by an underscore) and that the Brief output will be shown.
Press the Refresh action button to run the check.
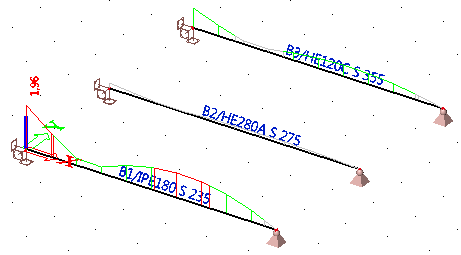
First of all it can be seen that the result is graphically shown in the Z-direction of the member axis system, just as it was set in the Check Header. In addition the color scheme is used as defined i.e. with values shown in red for results exceeding 1,00.
In addition each member shows a different check result which is expected since each member has a different cross-section and material.
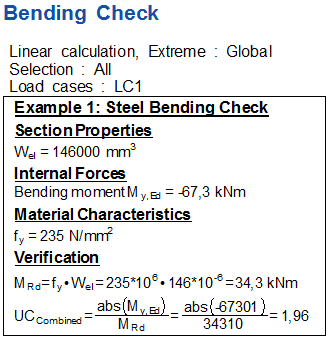
Press the Preview action button to display the preview of the Brief check:

Since this concerns a completely new check, the output is generated using the standard table layout. Using the Table composer this can be modified.
Intermezzo: Using the Table composer to edit the Brief output
This Intermezzo illustrates how the output table can be edited through the Table composer. For more information on the usage of the Table composer, reference is made to the SCIA Engineer WebHelp.
- First right click on the main table, for example in the Type name column and select Table composer from the context menu.

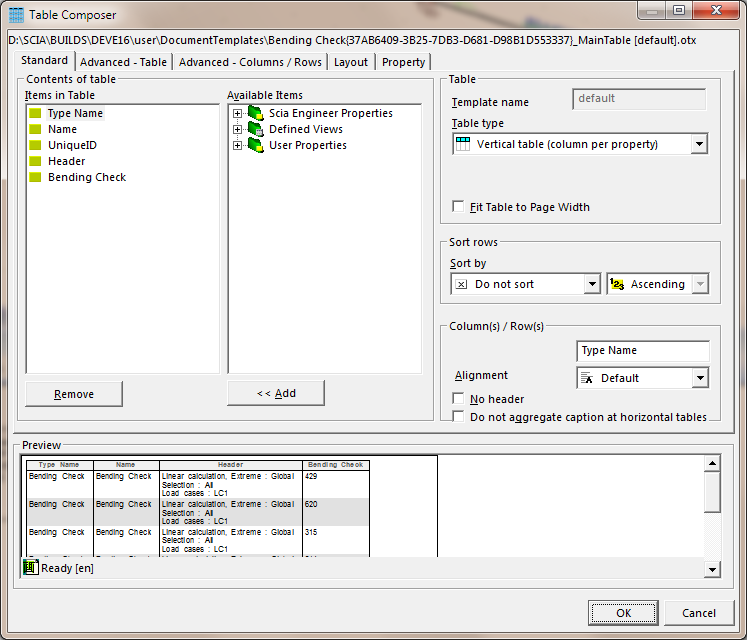
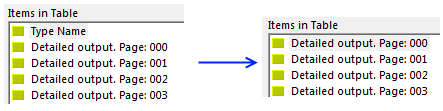
- In the Items in Table column, remove the Type Name and Name.
- Change the Table type from Vertical table to Simple form.

- Confirm the inputs with [OK].
- Press the Refresh action button

Note the subscript shown here for the UCCombined variable.
Switching the Extreme setting to Member and pressing the Refresh action button shows the check for all three members:

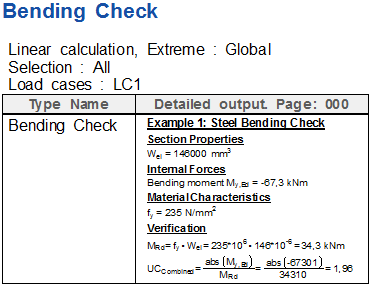
Step 8.2: Display the Detailed output
The previous Step illustrated how the Graphical and Brief output can be displayed. In this step the Detailed output is discussed which shows the rendered output of the Design Form.
In the Property window change the Extreme setting back to Global and set the Output to Detailed.

Press the Refresh action button to run the check.
As indicated above, this new output is again generated using the standard table layout. Using the Table composer this can be modified.
Intermezzo: Using the Table composer to edit the Detailed output
This Intermezzo illustrates how the output table can be edited through the Table composer. For more information on the usage of the Table composer, reference is made to the SCIA Engineer WebHelp.
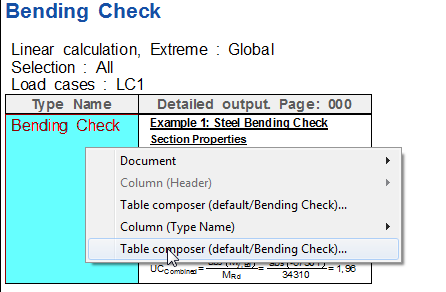
- First right click on the main table, for example in the Type name column and select Table composer at the bottom of the context menu.
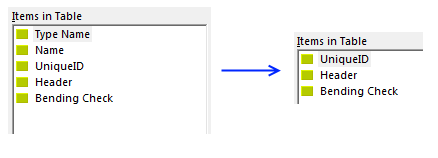
- In the Items in Table column, remove the Type Name.
The Detailed output for a Design Form Check can sent up to 50 pages of output back to SCIA Engineer.
In this example only the first page is used, so only the Detailed output. Page: 000 is modified.
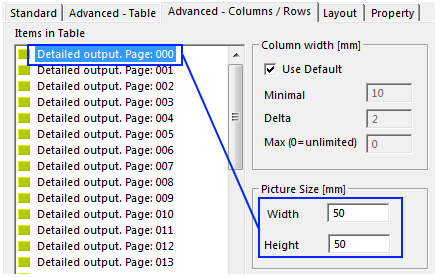
- In the Items in Table select the Detailed output. Page: 000 and activate the No header checkbox.

- Switch to the tab Advanced - Columns / Rows.
- In the Items in Table select the Detailed output. Page: 000 and change the Width and Height of the Picture Size both to 50 mm.
It is possible that different sizes should be used depending on the screen size.
- Confirm the inputs with [OK].
- Press the Refresh action button