Stress distribution
Elastic Stress distribution
The elastic stresses are calculated in the endpoints of the parts Ref.[5].
The elastic stress distribution y for each part can then be determined as follows:
With f1 and f2 the elastic stresses at the ends of the part.
The EN 1993-1-1 sign convention is used which implies compression stresses are positive
Plastic Stress distribution
To determine the plastic stress distribution a three algorithms are provided:
- Elastic Stresses
- Yield Surface Intersection
- Iterative Approach
Method 1: Elastic Stresses
In this method the plastic stress distribution is based on the elastic stresses f1 and f2 at the ends of the parts.
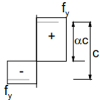
Uniform Compression
In case and
the section is assumed to be in uniform compression. This implies that α is taken as 1,00 for all parts.
Standard calculation of α
In case one stress is positive (compression) and the other negative (tension) the following calculation is used:
In all other cases α is taken as 1,00 for the given part.
Doubly-symmetric I-section
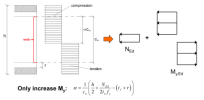
Specifically for a doubly-symmetric I-section (Formcode 1) the α value of the web element is overruled by the following formula Ref.[5]:
Within this formula the NEd is taken as positive for compression and negative for tension.
For large compressive forces this formula can lead to an α > 1,00 in which α is limited to 1,00.
For large tensile forces this formula can lead to an α <= 0,00. In this case the element is seen as in full tension and thus no classification is required.
In case y > 0 for the web element this indicates that the entire web is in compression thus α = 1,00.
Method 2: Yield Surface Intersection
For this method a full plastic analysis is run as described in Ref.[6]. This plastic analysis is based on the Initial Shape and uses a stress-strain diagram with yielding plateau. The ultimate strain for the yielding plateau is limited to 20%.
The yield surface is generated for the given section (using a predefined set of points) and the intersection of the actual forces is determined with this surface.
The actual intersection point does not always collide exactly with a predetermined point of the surface, so small deviations can occur.
From the location of the plastic neutral axis(PNA), which results of this analysis, the α value for the different parts can be determined Ref.[5].
Method 3: Iterative Approach
For this method a full plastic analysis is run as described in Ref.[6]. This plastic analysis is based on the Initial Shape and uses a stress-strain diagram with yielding plateau. The ultimate strain for the yielding plateau is limited to 20%.
The actual plane of deformation for the given internal forces is determined iteratively which provides an exact solution.
From the location of the plastic neutral axis(PNA), which results of this analysis, the α value for the different parts can be determined Ref.[5].


